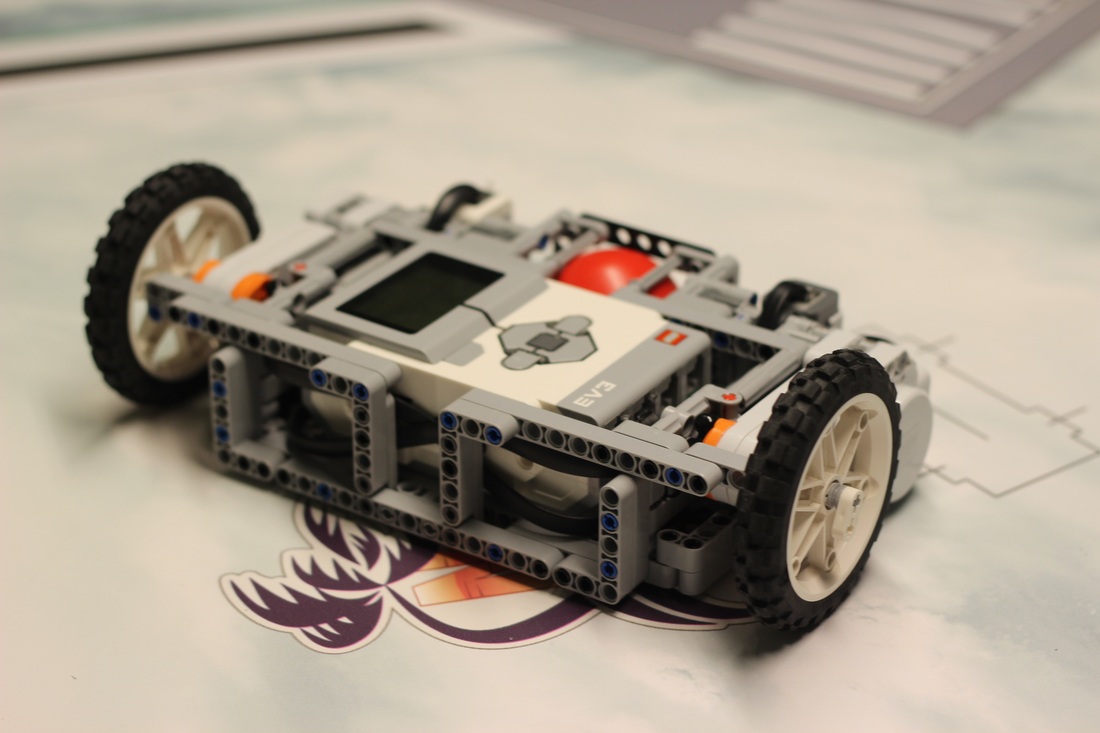
Tuesday 18 November 2014

We made a changing conditions program. It goes forward, registers of the wall and drives forward. Our program included the gyro sensor and various My Blocks.

What it does is;
1. Reset the gyro
2. Goes forward
3. Uses the TurnHeading my block to turn efficiently
4. Stops the motor
5. Goes forward
6.Usesthe TurnHeading my block (again) to turn efficiently
7. Stops the motor
8.Goes forward.

-Olivia

Wednesday 12 November 2014

Following a Line using a My Block

One of the challenges we've had with this year's competition has been following lines efficiently. The lines are different colors, sometimes we want to follow the left side of the line and sometimes the right, and we have different criteria for when to stop following.

Since we had this problem we assume others did as well, so here's our solution.

After programming a bunch of different missions and reproducing similar code several times we decided to try creating a My Block to do the work.

FollowLine My Block (click to enlarge)

This My Block takes four inputs: 
1) gain: the amount of correction to apply for a given size of error
2) power: the power applied to the driving wheels
3) light: the light level on the bright side of the line
4) dark: the light level on the dark side of the line

Using this My Block we can follow any color of line, along either side of the line.

We found some good advice online that said not to try to incorporate the end condition (when to stop following the line) in the My Block, and not to pass in the motor ports.  The end condition could be another light sensor detecting another color, a touch sensor being pressed, etc.  The way to accomplish this with this My Block is shown below:

In the example above, the robot drives with power of 40, using a gain of 1 to correct the steering, and stays between a white region of 40 and a dark region of 9, exiting the loop when the light sensor on port 3 sees black.  Note that changing the sign of the gain (-1 instead of +1) causes the robot to search to the left for the line instead of the right, allowing it to follow along the right side of a line instead of the left.  Also note that if you're using more than one light sensor you may want to add a "port" input specifying which sensor you want to use.

We hope this was helpful.  Good luck with your programs!

Saturday 8 November 2014

Does Your Child Confuse Letters or Write them Backward?

How to Correct Mirror Writing


Problem:   Children in grades 1 to 3 often write letters and numbers backwards, most commonly b's and d's, 3's and 5's, and 6's and 9's.  For example:


Solution:  Give the child a Rainbow Loom bracelet to wear on their wrist. Every time they go to write the letter or number they tend to reverse, they need to stop and move the bracelet to the other hand, then write the letter or number.


Why?   Moving the bracelet makes them stop and think about what they are doing. 

How it works:

1.         Determine the number/letter to change.
2.         Wear the bracelet.
3.         Before the student writes the number/letter they have to move the bracelet to the other wrist.

Most children who reverse letters and numbers know how to write them properly  When they write the numbers they tend to rush through it, without stopping to think about what they are writing. An example of this kind of mistake that happens with adults (and kids) is shown in the Stroop test. The Stroop test requires people to read the colour the word is written in, not what the word says. If you try it with the photo below, you might find that it is harder than it sounds.


Now, if you try it again, deliberately pausing one second between each word, you will likely find that you make less errors than before.

In the reverse writing solution, the bracelet forces a pause before writing, and the child is more likely to write the letter or number correctly.

If you try this solution, please let us know how it works in the comment section below.  Thanks!

--Olivia


Wednesday 1 October 2014

Robot Attachment Design

Below is a checklist to consider when designing your robot attachments.  The purpose of the checklist is to ensure that you consider a wide range of designs.  If you don't consider a variety of designs it's easy to focus on the first one you think of when simpler and/or better designs might come to mind if you just think a bit harder.

Mission Design Checklist

1) What's the simplest thing that could possibly work?

2) Is an attachment really necessary?

3) Could we accomplish the mission just by pushing?

4) Does the robot need to leave the base to accomplish the mission?

5) Does the attachment require power?

6) If the attachment requires power, must that power be provided by a motor?  Or could we use:
    a) Gravity
    b) Friction
    c) Elastics
    d) Pneumatics

7) If the attachment requires power, does it require a program?  Or can it be triggered by:
    a) Sudden acceleration or braking
    b) Contact with a wall or element of the mission table
    c) Contact with another attachment

7) Does the mission require one or more sensors?

8) Does the mission require the robot to be in a specific location?

9) If the robot must be in a specific location, can that location be reached by:
    a) Dead reckoning (simply counting wheel rotations and angles turned)
    b) Contact with a wall or mission table element
    c) Range finder
    d) Color finder
    e) Line finder
    f) Touch sensor
Week 5

FINANCES

This week we reviewed our finances.  The Toonie Toss was a big success, raising almost $150 after paying expenses.  This leaves us with $280.  We still need to buy t-shirts, and may have some other incidental expenses, but we're in pretty good shape.

CORE VALUES

We reviewed the FLL Core Values.  These account for 1/3 of our overall grade, so it's important that everyone a) know them, and b) practice them.  Each week we will do a team building exercise that allows us to work on those values.  This week's exercise required working as a team to build the tallest structure we could in 5 minutes, using a deck of playing cards.  The steps to doing well on this type of exercise include:

a) Having on member read the task to the rest of the team.
b) Verify that each team member understands the task.
c) If there are any questions, clarify them with the judges before starting.
d) Allocate some time at the start of the task for collecting ideas and dividing work.
e) Work together, or in subgroups, to accomplish the required task.
f) Enjoy yourselves and make sure that each member is listened to and valued.

PROJECT

We studied and approach to learning that involved simply listening to a set of instructions.  Helen divided the team into pairs, and gave each team nine cards.  She then described the steps involved in having one member of each pair choose a card out of the nine, and having the other member figure out which card it was.  Some teams did well listening to and remembering the instructions.  Others had difficulty. For video instructions, see below:


Next week we will try a different approach to teaching and learning, explained by one of the experts we'll be interviewing.

MISSION/ROBOT

With our mission table complete we are working on designing the robot.  Olivia and I went to a FLL conference at Bayview Glen School in Toronto.  The conference covered robot design and programming, among other things.  Among the concepts they recommended were the use of a simple base, to which mission-specific attachments could be added.  They emphasized using non-motorized attachments as much as possible.  Today we discussed and showed:
a) gravity driven attachments
b) rubber band driven attachment
c) pneumatic (pressurized air) driven attachments
d) friction driven attachments
e) motor driven attachments (including a scissor jack).

We also showed a line-following robot, which was taught at the conference.

Today we considered how to incorporate those ideas into attachments for our own missions.

Last week I recommended looking at the Lego Vinir videos on YouTube.  They also have some great information on their site (http://en-lego-vinir.weebly.com/our-robot.html).  See, for example, their robot base:


If you watch the video you will see examples of attachment types (a) through (e) above, i.e., gravity, rubber band, pneumatic, etc.  See if you can find an example of each for next week, along with a way we could use it on our own design.


Wednesday 24 September 2014

Week 4

This week we ran a team building exercise on the playground, which involved holding hands in a ring and passing hula hoops around the ring in opposite directions without letting go of each other's hands.  This requires some original thinking, teamwork, and communication - good practice for the competition.

We also heard presentations from those who said last week that they wanted to be in charge of fundraising.  There were a lot of good ideas, but Amy's presentation was the best organized, most thorough, and best presented.  Amy, you are now in charge of fundraising!  First on the fundraising list is a Toonie Toss for tomorrow night's Franco Fete.

Also today we finished up the competition table.  Yay!  We can now start prioritizing missions and designing strategies for completing them.

We discussed building a base robot with interchangeable attachments that could be added and removed for different sets of missions.  We did this last year, using one set of wheels for most missions and changing them out for the obstacle course.

The kings of the base robot / attachment world have to be Lego Vinir.  They have videos of their robot from last year's competition, along with explanations of how it works.  There are a lot of good ideas there.  Check them out at:

Lego Vinir Overview

Lego Vinir Step 1

Lego Vinir Step 2

Lego Vinir Step 3

You each received a book entitled, "The Lego Mindstorms EV3 Discovery Book."  Look closely at the robot design in the videos and see of you can get any ideas from the book on how to build and program such a thing.

Thursday 18 September 2014

Week 3

This week we:
a) took a look at how we each learn, to find approaches to learning outside of a classroom lecture.
b) did more work on setting up the competition board.  
c) chose people for particular roles on the team.

Some things you might want to look at for next week are:

1.  Online quiz for multiple intelligences

http://www.edutopia.org/multiple-intelligences-assessment

2.  Chart showing describing intelligences:

Children who are strongly:
Think
Love
Need
Word Smart
in words
reading, writing, telling stories, playing word games, etc.
books, tapes, writing tools paper diaries, dialogues, discussion, debate stories
Math Smart
by reasoning
experimenting, questioning, figuring out puzzles, calculating, etc.
things to explore and think about, science materials, manipulatives, trips to the planetarium and science museum
Picture Smart
in images and pictures
designing, drawing, visualizing, doodling, etc.
art, LEGOs, video, movies, slides, imagination games, mazes, puzzles, illustrated books, trips to art museums
Body Smart
through somatic sensations
dancing, running, jumping, building, touching, gesturing, etc.
role play, drama, movement, things to build, sports and physical games, tactile experiences, hands-on learning
Music Smart
via rhythms and melodies
singing, whistling, humming, tapping feet and hands, listening, etc..
sing-along time, trips to concerts, music playing at home and school, musical instruments
People Smart
by bouncing ideas off other people
leading, organizing, relating, manipulating, mediating, partying, etc.
friends, group games, social gatherings, community events, clubs, mentors/apprenticeships
Self Smart
deeply inside themselves
setting goals, meditating, dreaming, being quiet,
secret places, time alone, self-paced projects, choices

Nature Smart
by being in nature or around animals
taking nature walks, being with animals, touching nature, climbing trees, being outside
to be outside, touching nature, climbing trees, caring for animals, trips to nature museums

Monday 8 September 2014

Week 1

Great news!  Our Field Setup Kit arrived today.  This is the kit with mat and all the pieces necessary to build the parts, obstacles, etc. that the robot will interact with during the missions.  The kit contains parts divided into different bags, with a bag for each mission.  

The completed game board will look like this:

World Class Field Setup
The instructions for assembling the parts for each mission can be found at:


We will spend time this week getting the competition board set up.

Friday 5 September 2014

Ecole Catholique Cathedrale First Lego League Blog

Welcome back, Comets!  This season we've got no time to waste, as the competition is two weeks earlier than last year.  It will be held November 22 at Duncan MacArthur Hall (Queen's West Campus).

We'll be using this blog to keep you informed about news, tips, progress, dates, and so on during the upcoming season.  Please check back regularly to make sure you get all the necessary information!

Remember that the First Lego League competition consists of three main parts: 1) core values, 2) the project, and 3) the game.  The core values define how we work together as a team, and how we interact with other teams.  The project is a team research effort in a specific area, with the team required to develop and share a solution to a particular problem.  The game involves the design of a robot to complete as many missions as possible on a specially designed board.

Most participants find the robot component the most fun, but remember that the overall score is based on all three components, with each counting for roughly one third.  Your robot could complete every mission in the game successfully and your team could still finish last overall if you don't do well on the project and don't demonstrate the core values.

To get up to speed quickly on the core values, the project and the game, please check out the videos below:


The core values:


The project:


The game: